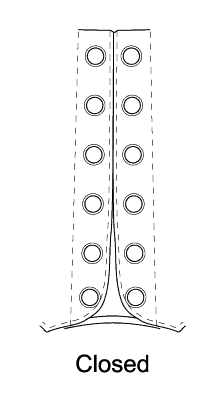

This
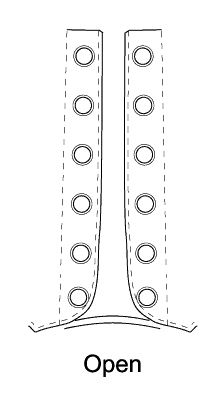
Instead of this.
I know of three variations on the ladder lacing. All three are conceptually identical: the only visible laces are those that pass from one side of the boot horizontally across to the eyelet on the other side, as shown in this picture. However, there are three lacings to allow for variations on design and construction of the boots. See below for further information.
Since the Ladder Lace cannot be done symmetrically (like the Spider Web lace is done), I've had to make a decision regarding how to describe left and right. As you will see, the diagram is drawn as if you are looking at the boot standing in front of you. I chose this orientation because it's much easier to do complex lacings in this manner. Lacing boots while wearing them generally results in my back cramping about halfway through the first one. My preferred way of lacing is to hold the boot between my thighs while lacing. Come to think of it, holding a boot between my thighs is my preferred position for a lot of things. But I digress. For the purpose of description, right and left refer to the sides of the boot when held in front of you, sole down.
Finally, keep in mind that the ladder lacing is particularly difficult to tighten. Because of the extent to which the laces are tucked between the quarter and the tongue, tightening can only be accomplished by pulling on each "rung" of the ladder, which can be something of a chore. Likewise, loosening the laces is usually a chore. This is not a lacing that makes boots easy to remove. Leave 'em on, fer chrissakes! Also, in Variants 2 and 3, the lacing is completely asymmetrical, meaning that tightening and loosening the laces will result in lace ends of unequal length.
Variant One is what I consider the standard ladder lacing. It's structured as a standard "both ends of the lace start at the bottom and move upward" lacing. It only works for boots with an even number of eyelet pairs, though. One of the websites where I researched lacing claims that this is not the standard ladder lacing, and that skinheads frown upon this method. I have trouble believing that a consortium of skinheads has laid such a pronouncement upon this lacing method (it turns out that the ISO is, in fact, not The International Skinhead Organization; who'da thunk it?). This is my preferred method of lacing. It's easy to figure out and doesn't cause problems when you tighten it, like Variations 2 and 3 do.
Variant Two is a version of the ladder lacing that is conceptually similar to the Bal-lacing method for police patrol boots. It works for boots with either an even or odd number of eyelet pairs. The only caveat is that this lacing only looks good if the throat can be "closed" (see below). That is to say, when the laces are completely tightened, the boot looks like:
 |
 |
|
This |
Instead of this. |
This is a function of a) how big your ankles and calves are, and b) how much leather the bootmaker has given to encase your legs. When using this lacing, be aware that changing the tightness of the lacing will alter the length of one lace, but not the other (this will make sense when you read the lacing instructions). Plan ahead regarding the length of your lace ends.
Variant Three is something of a cross between Variant One and Two. The drawback with this lacing is that it requires the lace to run down the boot between the quarter and the tongue, which may be uncomfortable, may cause the quarters to sit slightly out of alignment, and reduces the amount of space available to perform the rest of the lacing (again, this will make more sense when you read the directions for the lacing). Like Variant Two, tightening this lacing will result in one end of the lace getting longer, while the other doesn't change. Like Variant One, it only works on boots with an even number of eyelet pairs.
Return to the Boot Lacing Page