The Ladder Lacing: Variant 2
This version of the ladder lacing has the fewest steps per "rung"
of the ladder. Also, this variant works for boots with any number of eyelet
pairs. It has a major drawback, however, in that one end will not lengthen when
the lacing is tightened. Do your best to estimate the proper length for the
dead end. If you make a mistake, the lengths of the lace ends can be adjusted
after the lacing is complete, but it's tedious.
Like Variant One, this lacing is asymmetrical, meaning that
I have written the instructions (and prepared the illustrations) referring to
the left and right of the boot. You can feel free to lace the boot in the opposite
direction; it shouldn't have any effect on the appearance of the completed lace.
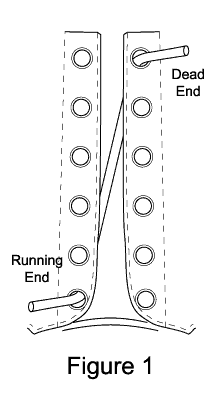
Rather than distinguishing between ends A and B like I did in Variant One, I
refer to the lace ends as the "dead" and "running" ends.
After step one, you will be moving only the running end, so I have not labeled
the ends beyond the first illustration.
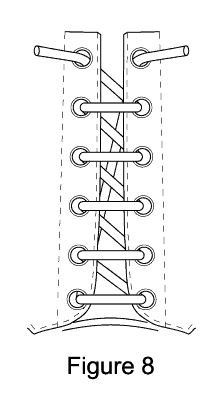
As you can see from Figure 8, this lacing is best suited for
boots which can be drawn completely closed, so that none of the tongue or the
underside of the lacing is visible. If the boot will not close when being laced,
use Variant 1 or 3.
|
Step 1: Begin by passing one end of the lace through the
topmost right eyelet, under to over. This will be the dead end of the
lace. Bring the other end, the running end, down and across through left
eyelet 1, under to over.
|
|
|
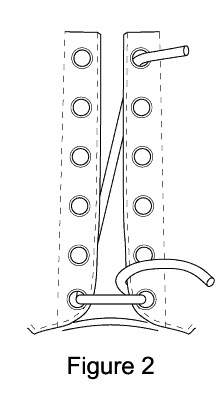
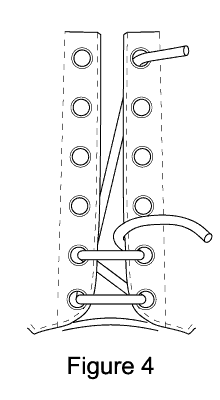
Step 2: Pass the running end across through right eyelet
1, over to under.
|
|
|
Step 3: Pass the running end up and across through left
eyelet 2, under to over.
|

|
|
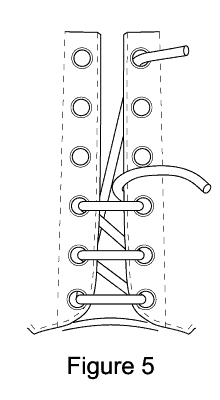
Step 4: Pass the running end across through right eyelet
2, over to under.
|
|
|
|
|
|
|
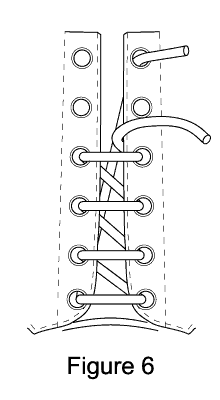
Step 5,6, & 7: Repeat Steps 3 and 4
until the loose end of the lace has in the eyelet directly below the held
end.
|
|
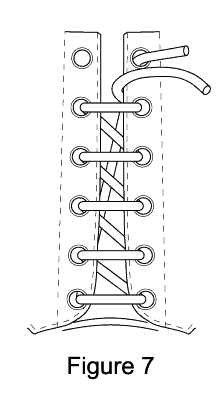
Step 8: Pass the running end up and across to the top
left eyelet.
|
|
|
The laces can now be tied in your favorite method. You
know how to do that, RIGHT?
|
Return to the Ladder Lacing Page
Or return to the Boots Page